Using the Cyberduck application with Content Gateway S3
Cyberduck is a free, popular, cross-platform GUI application that can connect to your Swarm domain using Content Gateway S3.
The default Amazon S3 profile in Cyberduck and V4 signatures work with recent Cyberduck releases and Gateway 6.2 and later.
But we also provide Swarm S3 profiles which force "bucket in path" style requests. Recent Cyberduck defaults to "bucket in host" style requests which works fine with Swarm S3 but requires that your HTTPS proxy server certificates include both domains and domain wildcards (mydomain.example.com and *.mydomain.example.com). Rather than using our profiles you can disable "bucket in host" requests with a Cyberduck internal settings https://docs.cyberduck.io/protocols/s3/#disable-use-of-virtual-host-style-requests:% defaults write ~/Library/Preferences/ch.sudo.cyberduck.plist s3.bucket.virtualhost.disable true.
Warning: you shouldn't have to use it, but the (non-default) "S3 AWS2 Signature Version (HTTP)" connection type does not use bucket-in-path style access even with that setting. This can lead to a Login failed / request signature mismatch and a "Cannot read container configuration" error when opening a bucket, due to a GET /?location request. Using the default "Amazon S3" profile works as do the "Swarm S3 (HTTP)" and "Swarm S3 (HTTPS) profiles" below. When testing be sure to eject any current connection, restart Cyberduck, and create a new connection on any test – changing the connection type seems buggy.
Note: products and open source virtual file systems like Mountain Duck and s3fs can usually be configured with Gateway S3 but are not supported and are known to have issues. ExpandDrive has worked as has "rclone mount" but we now recommend WebDrive. Please let us know if you are trying to use such software.
Installing and Configuring Cyberduck
In this example, the domain you've created and want to access is mydomain.example.com and you have configured DNS so that *.mydomain.example.com (wildcard domain) maps to your Content Gateway server or https proxy.
Download and install Cyberduck from https://cyberduck.io.
Download and install these two Cyberduck profiles for Content Gateway:
https://support.cloud.caringo.com/tools/Swarm S3 (HTTP).cyberduckprofile
https://support.cloud.caringo.com/tools/Swarm S3 (HTTPS).cyberduckprofile
OLD:
https://support.cloud.caringo.com/tools/Caringo%20S3%20(HTTPS,V2).cyberduckprofile
https://support.cloud.caringo.com/tools/Caringo%20S3%20(HTTP,V2).cyberduckprofile
If these files do not open in Cyberduck you might have to right-click them in Explorer and explicitly choose Open With => Cyberduck.
Using 100MB parts for multipart uploads improves the speed and storage efficiency of resulting streams. It's no longer necessary to set this as it's the default (https://docs.cyberduck.io/protocols/s3/?highlight=s3+upload+multipart+size#options).- Cyberduck should show a S3 configuration dialog. If not you can always choose File => Open Connection.
- In the drop-down at the top, select the connection type of "Caringo Swarm S3 (HTTP)" if http or the "Caringo Swarm S3 (HTTPS)" if you're using an SSL proxy in front of Content Gateway.
You'll need an S3 token for your domain. Generate a new access key (token) via a command-line curl or the Content Portal.
Enter a nickname for this connection, e.g. your domain name but note the name does not matter.
Enter
mydomain.example.comin Server and enter your S3 port (it is configured in /etc/caringo/cloudgateway/gateway.cfg).Verify the URL displayed is correct and accessible from your machine.
Enter the 32-character token uuid as the Token ID or access key. You'll enter the secret later.
Close the connection configuration window and double-click the new connection you just created.
Enter the secret when prompted.
You should now see a list of all the buckets in your domain. It will be empty if the domain is new.
- Create a new bucket with File => New Folder. You might have to press the Refresh button to see it.
- Now you can drag and drop files or folders in and out of your domain, sync directories, edit object metadata, or create temporary signed url's.
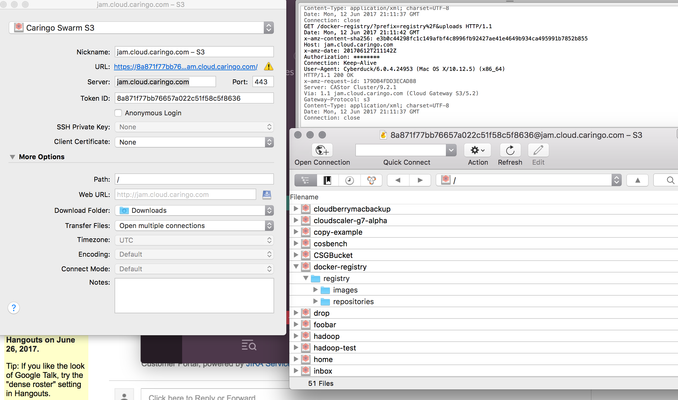
This screenshot shows the connection configuration:
Note: (CLOUD-2257) Prior to Gateway 5.1.3, our ETag for S3 multipart uploads did not match the AWS S3 proprietary format. For smaller streams, the Etag is simply the MD5 of the contents, but streams uploaded in parts have a different format. You can safely ignore warnings like this after a large object write: "Mismatch between MD5 hash 57eb4d3a64d0078c68a22de0a474ad00-24 of uploaded data and ETag 1053f6a7f1515529e70d1c672727f1c0 returned by the server."
Note: (CLOUD-2506) Gateway 5.1.0 had V4 signature issues with folders containing a space or with reliability of large uploads. If you are unable to upgrade please remain on the earlier release of Cyberduck 5.0.11 from https://cyberduck.io/changelog/.
Note: (CLOUD-2628) Cyberduck (specifically the JetS3t client) adds the Expect header to its list of signed headers. This causes writes to fail with: "The request signature we calculated does not match the signature you provided." when using the "pound" https proxy. We recommend you use another load balancer like "haproxy" instead. You can possibly avoid this problem by setting by setting s3.upload.expect-continue to false (https://trac.cyberduck.io/wiki/help/en/howto/preferences).
Note: the handy Log Drawer feature which showed HTTP request/response headers is gone but on macOS try ''defaults write ch.sudo.cyberduck logging INFO'' to view the log messages in the console.log.
© DataCore Software Corporation. · https://www.datacore.com · All rights reserved.