Console - Cluster Services
The CSN Console is the primary administrative interface for the CSN as well as the other services and software installed on the shared server. It allows both basic configuration changes as well as more complex functions like creating manual configuration backups or changing Swarm software versions.
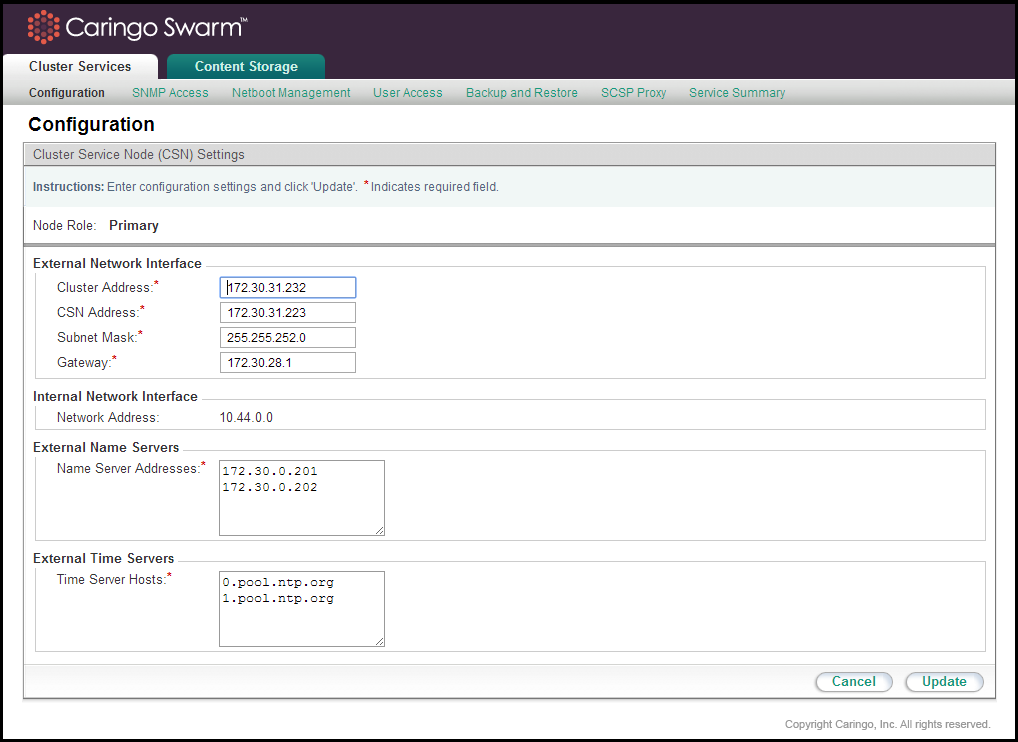
Configuration (network and servers)
Administrators can update network parameters specified during the initial configuration process via the Cluster Services > Configuration interface.
Note
When changing values for any network parameter, the console may return a list of resulting actions that will need to be taken by each of the services and installed software modules. Because the network configuration is central to so many services, it is not unusual for the resulting action list to contain service restarts and possibly a server reboot.
Dual-network: Automatically Reconfiguring Network Settings
If the network in which the CSN is deployed changes, you can run a script to update the CSN's network bonding configuration. You can do this for any of the following reasons:
- After adding, removing, or replacing a NIC or after reconfiguring cabling, both of which can result in incorrect bonding configuration.
- After rebuilding the network from the current configuration in the event of misconfiguration (for example, after manually editing configuration files or if an external process modified the network configuration).
- As part of reinstalling the CSN because you need to reset the entire network configuration.
Important
Command syntax follows:
/opt/caringo/csn/bin/reconfigure-network [-bonded [ -autodiscover]]
Argument | Description |
|---|---|
none | Removes bonding from all network interfaces. Sets up an unbonded network on eth0 and removes any other ethx or bonded network configuration. To determine the network configuration for eth0, the utility first examines the current CSN configuration but, if none exists, it uses the public network bond defined by ifcfg-bond1. |
--bonded | Sets up public and private bonds using the current CSN configuration. If that information does not exist or is not complete, the command fails. |
--bonded --autodiscover | Automatically discovers all internal and external network adapter information and sets up public and private bonds using the current CSN configuration. |
Reconfiguring All Network Settings
To completely reconfigure the network settings in a dual-network configuration:
- Enter the following command as a user with root privileges:
/opt/caringo/csn/bin/reconfigure-network
This removes bonding from all network interfaces. - When prompted, reboot the machine.
- After the server has rebooted, enter the following command as a user with root privileges:
/opt/caringo/csn/bin/reconfigure-network --bonded --autodiscover
Prompts similar to the following display:Configuring external/internal ports. This may take some time.
Checking ... eth0 ...eth1 ...eth2 ...eth3 ...
Eth Device | MAC | Public? | Bond
eth0 | 00:0c:29:e2:e6:65 | Y | bond1
eth1 | 00:0c:29:e2:e6:6f | N | bond0
eth2 | 00:0c:29:e2:e6:79 | N | bond0
eth3 | 00:0c:29:e2:e6:83 | Y | bond1
=============================================
Disconnected NICs =
Recommended ethernet device assignment
Internal NICs = eth1 eth2
External NICs = eth0 eth3
Input the list of External NICs.
The preceding displays how CSN has allocated your available NICs by assigning them to internal and external CSN interfaces. All NICs that are currently connected to the network display. Any NICs that are not connected to the network display as Disconnected NICs. After you connect them to the network, you can assign them to internal or external CSN interfaces by running this script again. external nics [space-separated-list]:
Displays the list of NICs that CSN has determined are for its external interface. You can optionally change the list if you want.internal nics [space-separated-list]:
Displays the list of NICs that CSN has determined are for its internal interface. You can optionally change the list if you want.Are these values correct (yes/no)?:
Enter yes to confirm the NIC assignments are correct or no to change them.
Messages display as changes are made and processes are restarted.
Restoring Current Network Settings
To rebuild the current configuration, enter the following command as a user with root privileges:
/opt/caringo/csn/bin/reconfigure-network --bonded
Messages display as the network interfaces are reconfigured. When prompted, reboot your machine.
Dual-network: Updating the Internal Network
Updating the internal network for a CSN can be extremely disruptive because it requires a coordinated update between the CSN and the Swarm cluster to ensure the two are using the same internal network. Updates to the internal network should be made only when absolutely necessary, using the following command:
/opt/caringo/csn/bin/changeinternalnetwork 172.20.0.0
where 172.20.0.0 is the desired new internal network.
Best practice:
- Reboot the Swarm cluster from the Swarm Admin Console.
- Run the
changeinternalnetworkscript while the cluster is rebooting so that, when the nodes come back online, they are assigned a new IP address from the new internal network interface range. - Because the script only changes local parameters (
cluster.cfg,netboot.cfg), Swarm's PSS can overwrite them. Set the new logging host in Cluster Settings: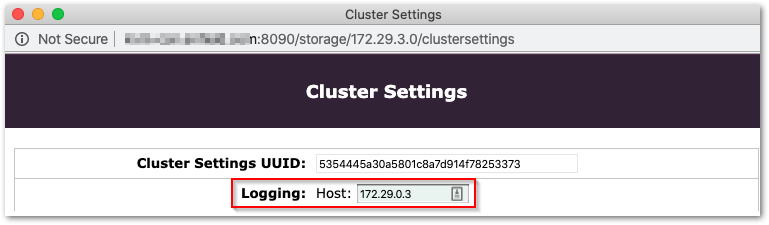
Alternatively, you can run the script and then manually power cycle the nodes; the Swarm Admin Console will no longer be able to route the reboot request after the internal network has been updated. Several CSN processes, including the NTP server, will be restarted when the script completes. After the Primary CSN has changed its internal network and the storage cluster is back on line, you should change the Secondary CSN's internal network to the same as the Primary.
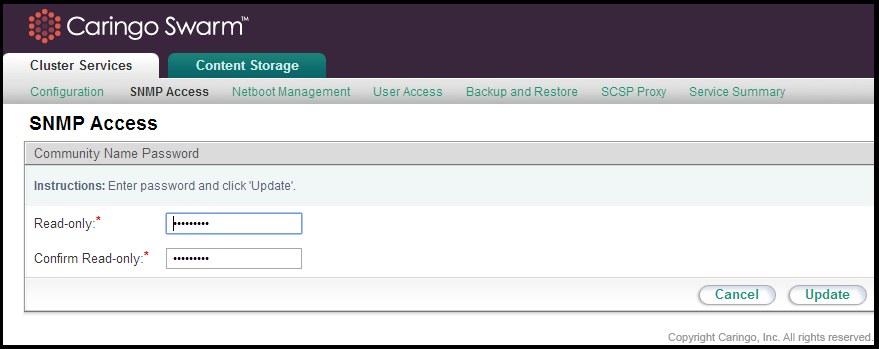
SNMP Access (read-only commands)
The CSN installs the Net-SNMP command line tool for use in collecting SNMP data from the aggregated storage MIB, CARINGO-CASTOR-MGR-MIB. The tool utilizes standard SNMP commands like 'snmpwalk', and 'snmpget'. For read-only commands (snmpwalk, snmpget), the CSN expects a password of 'public' by default. The read-only default password may be updated from the Cluster Services > SNMP Access link of the CSN Console:
Disabling SNMP on a CSN
To disable SNMP on a CSN (prevent it from responding to SNMP requests), follow this process:
Comment out these three lines in this file:
/etc/monit.d/caringo-csn.monitrccheck process snmpd with pidfile "/var/run/snmpd.pid" start program = "/etc/init.d/snmpd start" stop program = "/etc/init.d/snmpd stop"
Turn off the
snmpdprocess:chkconfig snmpd off
- Reboot the CSN.
After the reboot finishes, verify that port 161 is not listening.
netstat -an | grep 161
Disabling SNMP
This does not disable SNMP on the storage nodes themselves. This is specifically to stop the CSN from responding to SNMP requests.
If you need to disable SNMP cluster-wide, such as for a security need or using Swarm in containers, disable the Swarm Storage setting snmp.enabled. (v12.0)
Netboot Management (Swarm version)
To update the version of Swarm software being used in the storage cluster, you must install the new rpm using the following command from a standard RHEL terminal window:
yum install [new Swarm version]
After the install, a new Swarm software version will appear on the Cluster Services > Netboot Management page of the CSN Console:
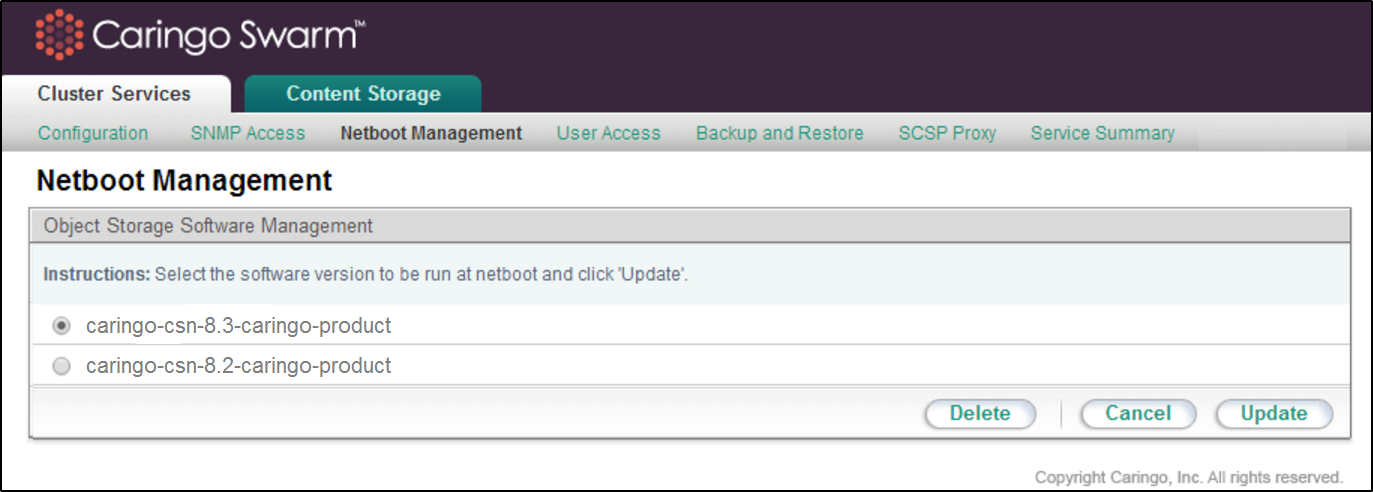
To switch to an alternate Swarm software version, select the desired version and click 'Update'. This will change the software image used to network boot all Swarm nodes. The Swarm cluster must be rebooted to pick up the new version. You may reboot the Swarm cluster all at once or with a rolling upgrade one node at a time from the Swarm admin console to pick up the new version.
Note: Suspending volume recoveries from the Swarm admin console is not necessary. Swarm will automatically enter into maintenance mode after an admin initiated reboot. Administrators may wish to delete older versions of Swarm software that are no longer needed to reduce the size of configuration backups.
User Access (CSN console)
The user name for accessing the CSN console is 'admin'. The admin password defaults to 'caringo' and is updated from the Cluster Services > User Access link.
For Swarm 7.2 and later, you must change the Swarm Storage admin password via an SNMP command to the Swarm cluster (or the Swarm Storage UI). From the CSN, run a command like the following:
snmpset v2c -c <CURRENT- READ/WRITE- SNMP- PASSWORD> -m +CARINGO CASTOR-MIB <SWARM- NODE- IP>
	addModifyAdministrator s "admin:<NEW- READ/WRITE- ADMIN- PASSWORD>"
Example:
snmpset -v2c -c ourpwdofchoicehere -m +CARINGO-CASTOR-MIB 172.20.3.85 addModifyAdministrator s "admin:newpassword"
Tip
Backup and Restore (CSN configuration)
To help with recovery in the event of a hardware failure, the CSN includes a backup mechanism that backs up its configuration files to Swarm and then allows restore of those backups at a later date.
Important
In order for a CSN Restore action to work, the manifest UUID must be present in the cluster. Take these steps to verify that the manifest UUID exists in your cluster before using the backup/restore feature. (CSN-2117)
Get the
manifestuuidfrom the bootstrap file, which only contains the UUID:/var/opt/caringo/csn/backup/manifest/.bootstrap
Check whether the manifest UUID is present in the cluster. Run this command:
curl -IL [nodeip]/[manifestuuid]
- If the manifest UUID is not present in the cluster, regenerate it:
- Remove that UUID from .bootstrap file.
- Return to the CSN UI.
- Create a new backup, which will generate a new manifest UUID.
- Create a manual backup to verify that it works.
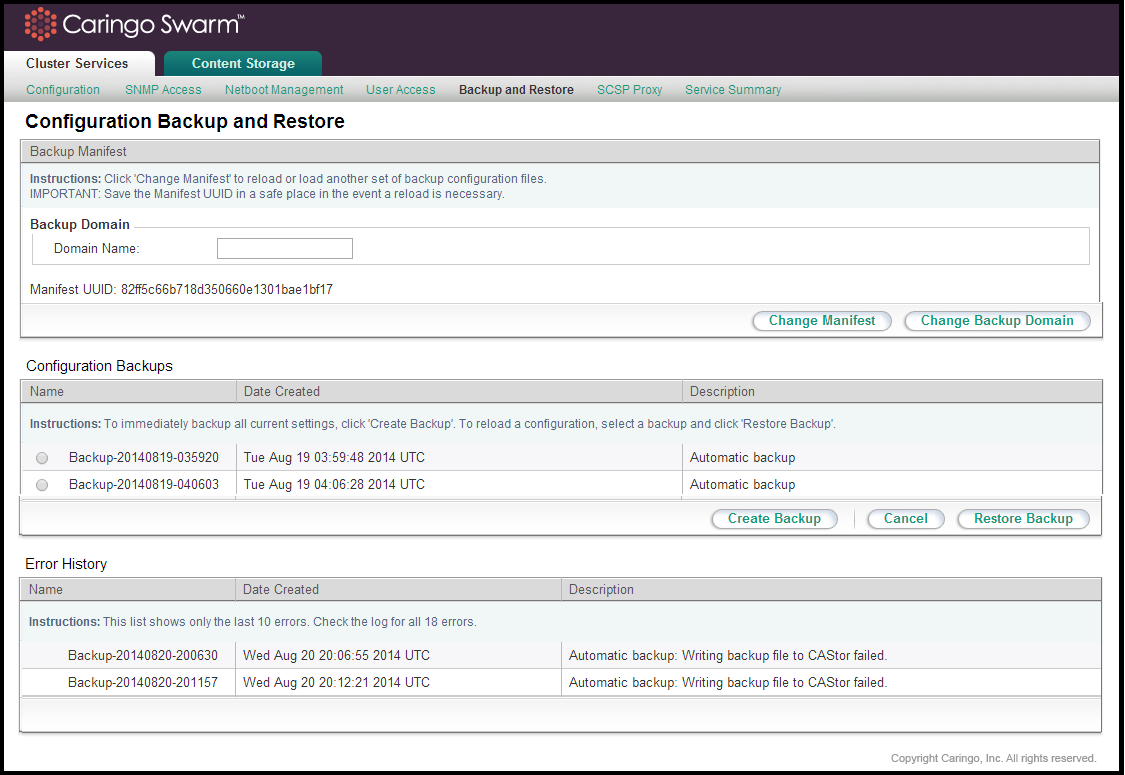
The backup list and functions can be accessed from the Cluster Services > Backup and Restore link of the CSN Console:
Backup Domain
The Swarm storage domain to which the CSN writes configuration manifests and backups is configurable to allow administrators in tenanted clusters to determine where the backups are stored. The CSN will not create the domain if it does not exist so administrators must ensure the configured domain exists in the Swarm cluster or the domain configuration will fail in the console.
Important
If you are using Content Gateway (CloudScaler) and CSN together in the same environment, you must first create a domain in the Content UI Overview for your CSN backups and then specify this domain in the CSN Console.
Backup Manifest
A manifest of all saved backups is created in the storage cluster with the first backup set and updated with every subsequent backup. This manifest allows an administrator to retrieve the list of available backups from the storage cluster in the event of a CSN hardware failure. The UUID for the manifest is displayed at the top of the backup interface. It will not display until after the 2nd backup has been created. Note: Administrators should copy this UUID into a safe location so that in the event of a complete system failure the list of backup sets can be retrieved from the storage cluster. The backup manifest UUID is written with metadata that allows retrieval from an Elasticsearch-enabled cluster if the UUID is ever lost. Specifically the two following headers will be present on the manifest anchor stream:
CAStor-Application: backup_csn
CAStor-Application-Component: manifest
Automatic Backups
The backup utility watches a pre-determined list of CSN configuration files for file metadata changes. When a change is detected, the utility waits until the changes stabilize to prevent multiple incremental backups in a short time period and then creates a gzipped tar file with a complete set of all designated configuration files. This tar file is staged locally and then written to the storage cluster for protection. If for any reason, a backup fails to write to Swarm, an error will be logged and the backup will be retried periodically. Errors if the Swarm cluster is not fully online are expected; only persistent errors with a cluster present are cause for concern. The UUID of the backup set is also written into the Backup Manifest but is not displayed in the user interface. If the Backup Manifest is not retrievable for any reason, the backup set is written with metadata that allows retrieval from the Swarm cluster using Elasticsearch. Specifically, the following two headers will be present:
CAStor-Application-Automatic-Backup: yes
CAStor-Application-Component: saveset
The backup utility will periodically purge backups based on both age and backup count. The utility will keep at least 20 backups and, if there are more than 20 backups, it will purge any that are more than 30 days old.
Note: All backup times are displayed in Universal Time (UTC) and may not, therefore, correspond with the local system clock.
Manual Backups
Before you perform normal maintenance on the CSN, you can manually back up the configuration. You can manually back up the CSN configuration as often as every 30 seconds. Except for the fact that they are manually initiated, manual backups are identical to automatic backups with the exception that they do not contain the CAStor-Application- Automatic-Backup: yes header.
To create a manual backup set at any time, click Create Backup on the Cluster Services > Backup and Restore page. In the Description field, enter a name to describe the backup and click Create Backup. The backup runs in the background.
Restoring a Backup
To restore the service configuration files and enabled/disabled status as they existed as part of a specific backup set, select the radio button next to the desired backup set and click the 'Restore Backup' button. This will restore all configuration files and each service's status (enabled or disabled) to their saved state at the time of the selected backup and reboot the server to the previous configuration. Following a successful reboot, administrators should immediately restart their Swarm cluster to ensure the networks are aligned and the node IP addresses are maintained.
After upgrade, previous backup sets may be marked as being incompatible with a previous software version if the backup format or system layout has been changed. These backups cannot be restored with the current version but will remain available if the software is reverted to a previous version using the csn-reset functionality.
Note
Due to breaking changes in the cluster.cfg EC settings for Swarm 8.1, CSN 8.1 and higher prevent you from restoring CSN backups from versions prior to 8.1.
Restoring Swarm UI: The backup/restore mechanism does not include the changes created by the /usr/bin/configure_storage_webui_with_serviceproxy.py script. To restore a CSN 8.3 that has run this script previously, perform these steps after the normal restore procedure.
- Unset the target. Unsetting the target after a restore prompts Swarm to initialize Elasticsearch with the correct mappings. Use SNMP to set the configuration parameter
metrics.target(MIB:metricsTargetHost) to a null value. Without this step, the Swarm cluster will continue to try to send metrics data to the configured Elasticsearch target, which is not yet available on the newly restored system. When Metrics are initiated for the first time using the metrics.target command, the proper mappings are made. - Run the setup script. Run /usr/bin/configure_storage_webui_with_serviceproxy.py on the newly restored CSN. This will setup the Swarm UI, service proxy, and metrics from scratch.
Note
Failover
If a primary CSN fails, an administrator can choose to promote a secondary CSN to the primary CSN role by restoring the primary's backup manifest UUID onto the secondary and then restoring a backup set from the restored manifest list. The primary's backup manifest must have at least 2 backups in it prior to being used for failover. To assist with this transition, the secondary CSN periodically pulls the primary's Backup Manifest UUID via the privileged SSH channel and stores it in the following location on the secondary: /etc/caringo/csn/primary-manifest.txt. A timestamp on this file will notate the last time it was updated.
Note: If you are failing over a single-network primary to a single-network secondary, you must first configure the secondary's network to match the primary's previous configuration, including its IP address, since the CSN does not backup or restore network state for a single-network configuration.
To restore a manifest, click the 'Change Manifest' button at the top of the backup interface. This will bring up a entry box where the UUID you would like to restore can be entered. The entered UUID must be for a valid backup manifest created by the backup utility. If restoring a manifest on a machine that has an existing manifest and associated backups, you must be aware that the backup list will be completely overwritten when the entered manifest is restored.

Administrators should be aware that the secondary will effectively take on the network identify of the primary (both the cluster IP Address and the Primary's own IP Address) when the manifest and a selected backup within it are restored.
Note: Demotion of a Secondary CSN's backup set onto a Primary CSN is not supported. Failover should only be done when the Primary is not expected to return to service
Failover Without Swarm
If the failure of the Primary CSN coincides with an outage of the Swarm cluster, you will be unable to pull the Primary's Backup Manifest UUID from the cluster to restore it onto the Secondary. In this scenario, an administrator can manually restore the Primary CSN's last recorded backup set, which is updated hourly on the Secondary CSN if it has changed. The following command will restore the Primary's backup set onto the Secondary, effectively making the Secondary assume the role of the Primary CSN. The script should only be performed from the Secondary CSN with both the Primary CSN and the Swarm cluster offline:
/opt/caringo/csn/bin/failover_without_castor
The script will restart the Secondary CSN after the Primary's configuration has been restored.
SCSP Proxy (dual-network configuration)
The SCSP Proxy installation on the CSN allows for clients who cannot directly address the Swarm cluster due to dual-network configuration to send and receive SCSP requests to and from Swarm nodes. The SCSP Proxy is configured during the network bootstrap process to listen on port 80 of both the external and internal interfaces in a dual-network configuration.
The log level for the SCSP Proxy can be changed from the user interface by selecting an alternate value from the list and clicking Update. After you change the log level, services restart after a few seconds.
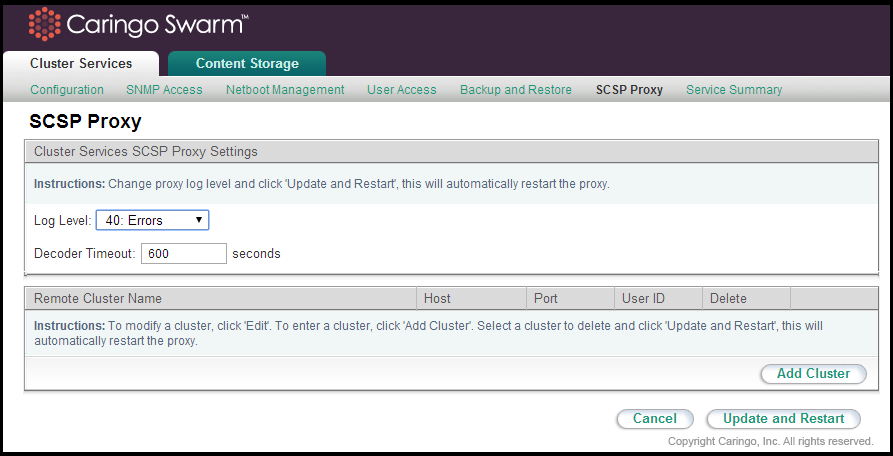
The SCSP Proxy is also capable of communicating with remote clusters to perform operations like global INFOs for one or more objects. See the SCSP Proxy Overview for a full overview of the supported remote methods.
To add a remote cluster to the configured list, click Add Cluster. To edit an existing remote cluster, click Edit.
To delete a cluster from the list, select the check box in the Delete column next to the cluster to delete and click Update and Restart.
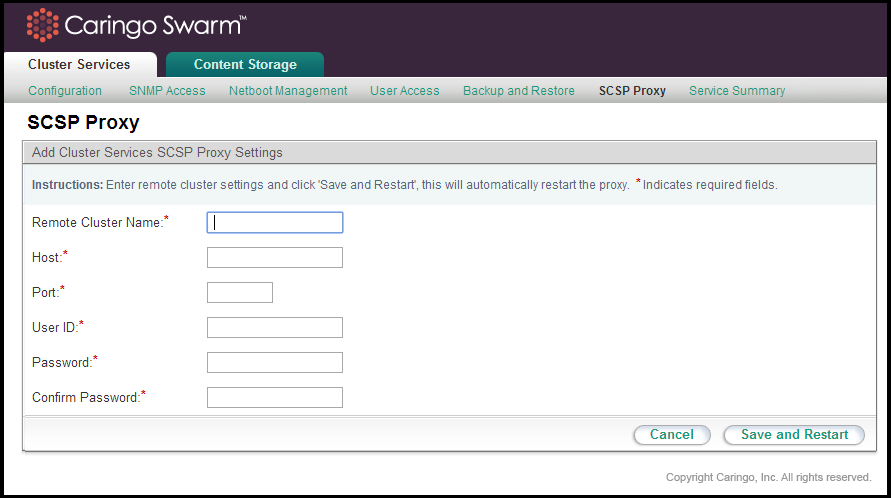
The following information is required for all configured remote clusters:
Parameter | Description |
|---|---|
Remote Cluster Name | The alpha-numeric name for a remote cluster that will be used in requests sent to the SCSP Proxy. Cannot contain whitespace. Can be the DNS name for the cluster but that is not required. |
Host | The IP address or hostname of the remote SCSP Proxy the local SCSP Proxy will communicate with. Cannot contain whitespace. |
Port | The port on which the remote SCSP Proxy will listen to incoming requests. This is usually port 80. May not contain preceding or trailing whitespace. |
User ID | The name of an administrator that belongs to the Swarm Administrators group for the remote cluster. May not contain whitespace. |
Password/Confirm Password | The password for the administrator specified in the User ID field. This value may contain spaces as long as they are not leading or trailing. |
The CSN Console should be used for all configuration updates, but, for reference purposes, all SCSP Proxy configuration parameters are stored in the configuration file:
/etc/caringo/scspproxy/scspproxy.cfg/etc/caringo/scspproxy/hosts.cfg
These files are automatically generated and should never be manually edited unless under direction of your support personnel. The SCSP Proxy service will be started automatically after the initial configuration of the CSN. If needed, it can be started, stopped or restarted as follows:
service scspproxy {start|stop|status|restart} Services Summary (versions and status)
A list of all services that are important to the overall health and operation of the CSN is available on Cluster Services > Service Summary. When available, each service's running version, installed package name, and status are included for quick visibility into system state. Because Swarm nodes can run different versions, the version field for the Swarm software is linked to the storage console where the versions can be viewed on the nodes themselves.
If the installed package name is different than the listed version, the service in question might need to be restarted.
If a service is shown as not running, this does not necessarily indicate an error because some services are optional.

Syslog Configuration
The initial configuration process, the CSN, SCSP Proxy and Swarm are all configured at install to log to the syslog server on the local CSN. Each application logs to a different log facility so the syslog server can separate the incoming log messages by product/function. The resulting log files are all located in /var/log/caringo:
- csnconfig.log
- castor.log
- csn.log
- scspproxy.log
All log files are rotated regularly and compressed. The logrotate process checks hourly to see if the log files need to be rotated based on either a size > 512mb or a created date > 1 week.
CSN Support Data Collection
To assist in troubleshooting field issues, the CSN supports the bulk collection of system state, configuration and logs via integration with a standard RHEL/CentOS tool, sosreport. To initiate data collection, simply type sosreport at the command line. You will be prompted to enter your name and a support case number. Your name will be defaulted to the name used to register your RHEL version. If you do not have a case number, enter any value. The tool will then collect relevant data about the system and combine it into a tar file that is saved to the /tmp directory with a generated MD5 for later validation. When necessary, this tar file should be sent to your support representative as one of the first steps in troubleshooting any system issues. The size of the tar file may be as large as 25MB depending on the amount of logging present on the system.
© DataCore Software Corporation. · https://www.datacore.com · All rights reserved.